So, in an attempted to make those, this was born.....
Which is great! Because Spice LOVES headbands!! She would rather wear a headband than a bow and she even SLEEPS in them! If she dosen't then she immediately gets one when she wakes up to put in her hair!
You will need:
*fabric scraps (mine were anywhere from 1/2 - 1" wide and 6 - 8" long, whatever works for you)
*hot glue gun
*headband
*sewing machine
*needle
*thread
*coordinating buttons or covered button
*safety pin
Step One:
Cut your strips, I used my rotary cutter with the pinking blade to do this
Step Two:
The headband I used was actually an old one that had paint on it and pretty stained up...
I cut off all the old ribbon, and wala....a fresh new headband ready to be revitalized!! You can find a pack of headbands at the dollar tree too!
Step Three:
I sewed about 9 of the strips end to end, right sides together to make one long strip.
Step Four:
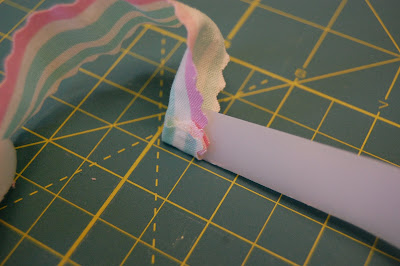
I then folded one of the ends lengthwise to make a little pocket. I hot glued the end of the headband into that pocket, making sure there was a little overhang to hot glue back over. Hopefully this will make sense in these pictures...
Step Five:
Once I had the fabric in place I simply started wraping and twisting. I would wrap then twist about two times so that the printed side of the fabric would show. I tried to keep it all squished up together. The length of my 9 strips lasted about half of the headband. So, I had to then sew more strips together to make the rest of the headband. **One mistake I made was that I started from where I left off, I advise that you then go back to the opposite end of the headband and glue down that end like the first strip. That way you have a tucked in edge on both ends of the headband.** When you meet in the middle just hot glue your fabric on the underside of the headband.
I did decide to make a little flower with my leftover strips....
I layed them out and folded the edges toward the middle and stuck my needle through the strip. From there I continued to stick strips until my flower, well, looked like a flower!
I stacked some cordinating buttons I had and sewed them on the center. A covered button would be just as cute..I just did not have one in the size I needed.
Wala....
RESULTS:
This took hardly any time since I had most of these things on hand! Hope you enjoy!!


This is so beautiful and creative! I love the colors and patterns of the fabric.
ReplyDeleteHappy Tuesday!
Yes!! Very cute and a great way to use up extra fabric that we all have around the craft room!!!
ReplyDeleteI do not have time for all your craftiness! You are too much! I'm just trying to survive each day :)! I can't wait to see it in person. I need a personal tutorial for me to be able to pull that one off. EK would LOVE it!
ReplyDeleteThat is such a great idea! I definitely need to make some of those. I have a link party on my blog on saturdays at http://www.iamonly1woman.blogspot.com I hope you can stop by the party is still going on :)
ReplyDeleteok you are making me sick with all your craftiness!! I LOVE this headband. So when can I come over to get a personal tutorial of shorts and headbands?
ReplyDeleteI love your color choices! It looks adorable. Thanks for sharing ... I've posted a link.
ReplyDeleteCute headband!! Thanks for linking @Creative Itch's "Sew Cute Tuesday"!
ReplyDeleteSuper cute!
ReplyDeleteYours is as sweet as candy
ReplyDeleteyumm yumm...
thanks for sharing
i've been featuring you in my blog
just check it out
http://childhood-obsessions.blogspot.com